
Kirk Trychel is the technical lead for cloud penetration testing at Secureworks® Adversary Group.
Threat actors regularly bypass endpoint protections to achieve their objectives, and so does the Secureworks Adversary Group (SwAG). In this blog, I’ll explain how SwAG tests within Microsoft Azure, and discuss a novel method we use to avoid endpoint protections. This is one example of the type of creativity Secureworks Adversary Group brings to dynamic testing for our customers. If you are interested in testing your cloud environment with us, check out this factsheet to learn more.
This article focuses on a method for testing from an internal perspective, so when referencing Azure, we are talking about the target’s environment. One of the most difficult things about testing against Azure environments has been the need to test from Powershell 5.0 and Windows. To run the best Powershell tooling available, this would require either spinning up a Windows VM and dismantling the local endpoint protections (defender, ASMI, etc..) or waiting until we have compromised a client end user workstation and then installing additional Powershell modules and tools there. Neither option is ideal, and frankly, making sure to install the right Azure Powershell modules can be both frustrating and time consuming.
Meet Azure’s Cloud Shell. A super handy tool built right into the Azure web portal UI, which consists of Powershell OR BASH interactive shells, both of which come pre-loaded with all the Powershell and Azure modules you need to start testing immediately, from the cloud, without installing anything on your own VM or a client workstation. For more information about Cloud Shell and a quick intro:
Overview - https://docs.microsoft.com/en-us/azure/cloud-shell/overview
Quick Start - https://docs.microsoft.com/en-us/azure/cloud-shell/quickstart-powershell
So that’s already pretty great. We can use Cloud Shell with any valid user (with permissions to create or utilize storage) to perform queries against AzureAD or interact with any other Azure services, without needing to install anything. Fantastic.
But that’s not all and here is where it gets really fun. Not only does Cloud Shell come pre-installed with the needed goods to interact with Azure command line interfacei, but it also supports importing additional modules and tools. Not only that, but Cloud Shell doesn’t seem to care at all what you load into it. Scripts that get flagged by Defender and AMSI so far have had no issue importing and running within Cloud Shell.
I’m going to show you how to easily import some of your own PS modules, as well as run a couple favorites.
Importing Modules and Tools
We’ll start with two of my absolute favorite tools for testing Azure – Azurehound and PowerZure. These tools are built for automated enumeration of the environment and will greatly speed up testing, as well as point you in the right direction for privilege escalation.
First thing to understand is that, in order to use Cloud Shell, a user must first create a storage share (or have previous storage). According to Microsoft docs, “On first launch, Cloud Shell prompts to create a resource group, storage account, and Azure Files share on your behalf. This is a one-time step and will be automatically attached for all sessions. A single file share can be mapped and will be used by both Bash and PowerShell in Cloud Shell.”
So the first time that you select Cloud Shell from within the Web UI, you will be prompted to allow creation of a file share. Cloud Shell will take care of the rest, so you can just accept default settings for any prompts during this initial launch process. Start the Cloud shell by locating and clicking on the terminal icon from within portal.azure.com, as shown below:
Once your Cloud Shell loads, you can immediately use it to run any of the usual Powershell or Azure specific commands as you would with AzureAD or any other modules, as shown below:
Importing and Running AzureHound
With our Cloud Shell functioning, we can start to import additional modules. Looking at the top row of icons on the Cloud Shell, we find an upload/download button, marked in red below:
Clicking on the icon gives 3 options: Upload, Download, and Manage File Share. If we click on Manage File Share, it will open in the background in our Web UI and we could also add, edit, or delete files there, as shown here:
Or we can select Upload from the Cloud Shell, which will prompt us to select a local file to upload. In this case, we will select AzureHound.ps1 (https://github.com/BloodHoundAD/AzureHound).
We are notified that the upload has completed:
And a quick check with dir shows it is now in our Cloud drive:
Prior to running AzureHound or other modules, it is a good idea to go ahead and sign in to both AzureAD and Azure cli with ‘Connect-AzAccount -UseDeviceAuthentication’ and ‘Connect-AzureAD’ as shown here:

Once authenticated to the needed services, running AzureHound is as easy as running the following commands:

Output:
The zipped data is stored in the Cloud Drive but can be retrieved locally with a single command:
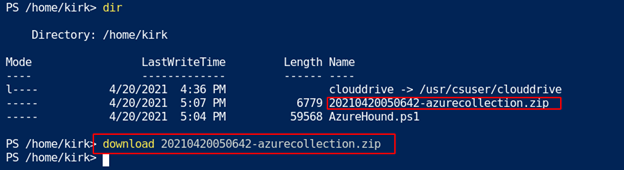
The download will save according to your browser settings (i.e., whatever your default folder location is for browser downloads).
That’s it! Now just import the zip collection into BloodHound and find those paths to priv esc.
Importing and Running PowerZure
In order to run PowerZure (https://github.com/hausec/PowerZure), we’ll need to make some small modifications. Download PowerZure.ps1 and then remove the following lines: 1, 98-158. In the screenshot below I have highlighted the lines:
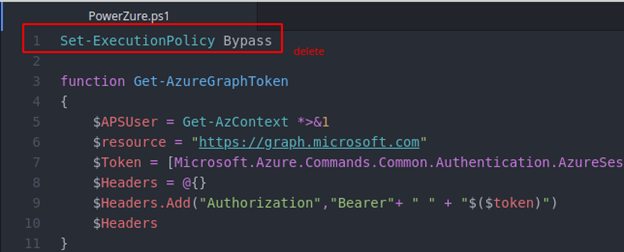
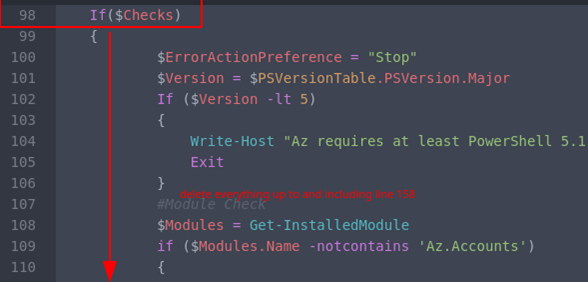
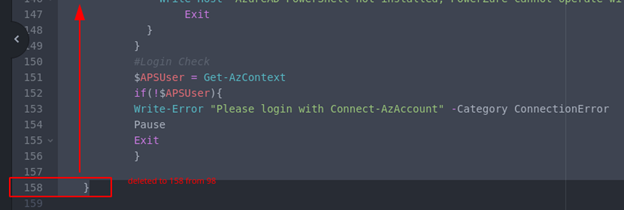
We are really just deleting the line for bypassing PowerShell execution policy and PowerZure’s installation checks which will not be able to find the PS modules as normal.
Resave the modified script. I called mine PowerZureCloud.ps1. Upload the modified script to Cloud Shell the same way we uploaded AzureHound.

Again, be sure to Connect to Azure and AzureAD with commands ‘Connect-AzAccount -UseDeviceAuthentication’ and ‘Connect-AzureAD’.
Then simply run ‘ipmo .\PowerZureCloud.ps1’ :
Now you can run any Powerzure commands as normal:
Note: Cloud Shell will even support tab completion for your imported PowerZure commands.
With the right user permissions you can even get code execution on VMs without ever leaving Cloud Shell, using the imported commands.
And once we have remote code execution, it's not a far leap to set up an encrypted reverse shell using DNS packets to bypass any egress filters and establish a C2. In the example below, I set up an attacker machine running dnscat2 (https://github.com/iagox86/dnscat2) and then uploaded an exe payload to one of the available VMs in the environment:
The result is easy shells back to c2 over DNS completely popped from Cloud Shell in portal.azure.com. No other access to virtual machine needed, just access to Azure Portal. And we never had to fight any endpoint protection software to install our tools.
You could also easily incorporate some Powershell scripting to pull a list of every server available to the given user, save into a variable, and then pop them all at once.
Summary:
Azure Cloud Shell is a useful tool for admins, but also makes for a great staging area for attackers looking to get signature-flagged tooling into a target environment without dealing with EDR solutions or antivirus. Since the Cloud Shell is internal to the target environment, attackers also don’t have to worry about firewalls or the blue team flagging traffic from external sources. It’s certainly a valuable resource when conducting penetration testing against any Azure environment.
There are currently no known mitigations available to configure within Azure environments. Azure customers are encouraged to follow some best security practices in order to protect accounts which have permissions to spawn Cloud Shell instances:
- Require Multi-Factor Authentication for all user accounts who can manage storage accounts.
- Follow least privilege and only grant permissions to create or modify storage accounts for those users who have a strict need.
- Monitor privileged accounts for new instances of Cloud Shell or the creation of new storage accounts.
If your organization is interested in learning more about penetration testing, including cloud specific environments, you can check out my blog about testing cloud and hybrid environments, or chat with one of our experts.
You Might Also Like
Secureworks has been acquired by Sophos. To view all new blogs, including those on threat intelligence from the Counter Threat Unit, visit: https://news.sophos.com/en-us/.